


Six months into AIPoint, I had no pipeline.
Not a slow pipeline. Zero pipeline.
I’d been doing what most founders do — building a list, writing emails, sending them, hoping. Reply rates were under 1%. I was blaming the copy.
The problem wasn’t the copy. It was the order I was doing things in.
Most teams do this:
Enrich → Personalise → Send → Wonder why it doesn’t work
The right order is:
Signal → Qualify → Enrich → Personalise → Sequence
One change. Everything improved.
Here’s the full process.
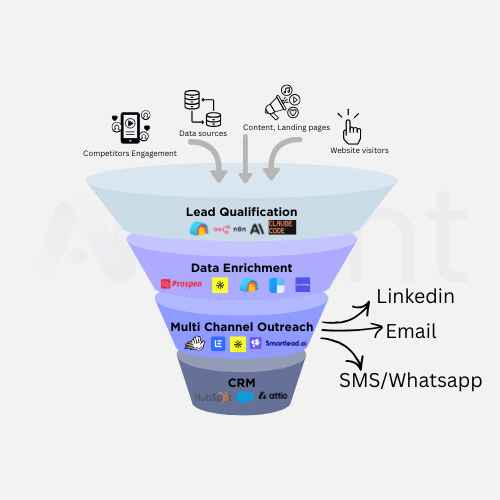
Stage 1 — Signal
Don’t start with a list. Start with accounts showing buying posture.
A signal means something has changed. Change creates a window.
The signals that matter most:
New VP of Sales hired — new leader, new mandate, new budget
SDR headcount growing — they’re scaling outbound, they need infrastructure
Series A/B funding — new money, new targets, new tools budget
Job posting for RevOps — they know they have a pipeline problem
Tools: Sales Navigator alerts, Common Room, TheirStack
Output: a raw list of accounts showing at least one signal. No enrichment yet.
Stage 2 — Qualify
This is where most teams leak money. They enrich everyone from the signal layer.
Enrich no one until they pass qualification.
I score every account across five dimensions — company size, deal value fit, sales motion, signal strength, and geography. Max 10 points. Anything below 7 goes on a watch list or gets cut.
In Clay, this is a formula column. Only rows scoring 7+ flow to Stage 3.
This single filter eliminates 40-60% of wasted enrichment spend.
Stage 3 — Enrich
Run providers in a waterfall. Sequential, not parallel.
My order: Prospeo → Dropcontact → LeadMagic → Lusha for mobile.
Each provider only fires if the previous returned nothing. You pay per successful hit, not per attempt.
After enrichment, verify everything with NeverBounce or ZeroBounce before any contact enters a sequence. Unverified emails damage your domain. Don’t skip this.
Target: 85-90% coverage on qualified contacts. Below 70% means your ICP filter is too narrow — go back to Stage 2.
Stage 4 — Personalise
One rule: reference the signal that triggered the outreach.
Bad: “Hi James, I came across your profile and wanted to reach out.”
Good: “Saw [Company] just brought on 3 new SDRs — curious how you’re thinking about data quality at that scale?”
The second one references the specific signal, implies your expertise, and asks a question they’ll actually think about.
I use a Claude Skill inside Clay to generate this at scale. The skill receives the contact’s name, role, company, and the specific signal — and outputs three first-line variations, each referencing the signal differently.
Key instruction in the skill:
Do not write a generic opener. Always reference the specific signal. Keep it under 25 words. End with a question.
Review a sample before launching. AI writes fast. You still need to check quality.
Stage 5 — Sequence
By this stage, every contact should:
Score 7+ on ICP fit
Have a verified email
Have a personalised first line
Four touches. Specific timing:
TouchDayPurposeEmail 1Day 0Signal-triggered opener + one questionEmail 2Day 3Different angle or relevant insightEmail 3Day 7Short “still relevant?” bumpEmail 4Day 14Final touch, close the loop
Under 100 words per email for touches 1-3. One idea. One CTA. No links in emails 1-2 — they trigger spam filters before trust is built.
Domain setup is non-negotiable: SPF, DKIM, DMARC on every sending domain, 2-week warmup minimum, secondary domains only for cold outreach.
Healthy benchmarks: 4-10% reply rate, under 3% bounce, under 0.1% spam complaints.
That’s the full process. Signal → Qualify → Enrich → Personalise → Sequence. In that order. Every time.
Want to learn how to build this yourself using Claude Code and Clay?
I’m running a live AI Outbound Masterclass — a 2-hour hands-on session covering exactly how to set up this system from scratch:
How to build Claude Skills for prospect research and personalisation
How to set up the Clay waterfall for enrichment
How to write first lines that reference buying signals
How to configure your email infrastructure so you don’t land in spam
Limited spots. Next session date: [add date].
Back to the SOP — here’s the tool that makes Stage 4 possible at scale.
How Claude Code Runs the Personalisation Layer
Most founders use AI reactively — paste a prompt, get an output, repeat. Claude Code is different.
It runs on your local files and data. You build Skills — reusable, repeatable AI workflows. And it integrates into your actual outreach stack, not just a chat window.
The GTM workflow looks like this:
Lead List (CSV)
    ↓
Claude Code (research + score + personalise)
    ↓
Enriched CSV with personalisation columns
    ↓
Clay (waterfall enrichment + sequence trigger)
    ↓
Instantly / Smartlead (send)
    ↓
CRM (log replies, update status)
The Skill that does the work:
---
name: prospect-research
description: Research a prospect and return personalised
talking points for outreach
---

You are a B2B prospect researcher.

When given a prospect's name, company, role, and buying
signal, you will:

1. Identify their likely top priorities based on role
   and company stage
2. Find 2–3 specific personalisation hooks
3. Draft a one-line personalised opener referencing
   the signal

Rules:
- Always reference the specific signal
- Keep the opener under 25 words
- End with a question

Output:
- Hook 1: [hook + source]
- Hook 2: [hook + source]
- Suggested opener: [under 25 words]
Invoke it in Claude Code with /prospect-research, paste the prospect’s details, and it runs. Download Claude skills here.
The full Claude Code setup guide — including installation, skill structure, prompt templates, and Clay integration — is in this week’s blog post: Claude Code for GTM — Step by Step
That’s it for this week.
If you want this system built for your business rather than DIY — book a free pipeline audit. We’ll map your current outbound setup and show you exactly where it’s leaking.
— Ima
Founder, AIPoint
Building predictable pipelines for ANZ B2B teams